F5 BIGIP is a very powerful and versatile product that can be used for several purposed. I started using it as a load balancer. Then I used it to replace the previous SSL VPN portal (and it works perfectly).
Some time ago I decided to start using it as reverse proxy (it was time for my old Microsoft TMG to be replaced and retire). It is easy to configure thanks to the LTM policies.
IP based vs Name based reverse proxy
In IP based web hosting you need to create a virtual server for each website you want to publish. So each of them would have a different IP assigned.
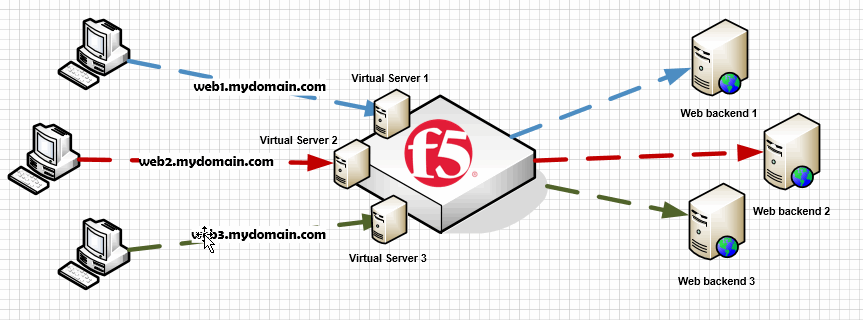
Creating an IP based reverse proxy is as simple as creating a virtual server with SNAT enabled (is a proxy) and a pool with the web backend (or the balanced backends assigned).
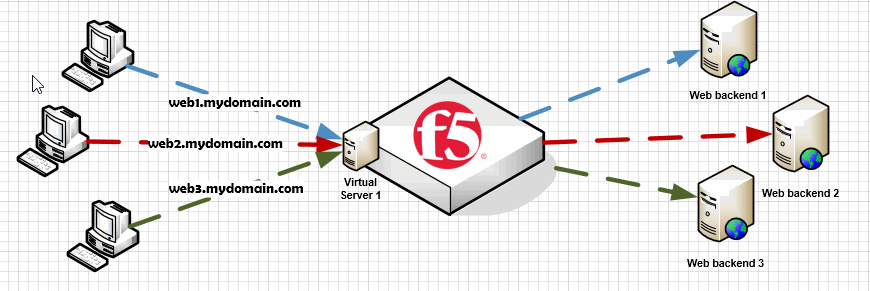
Name based web hosting allows publishing more than one web site in a single virtual server.
So all of them are sharing the same IP. Then, when a client performs web request, how can the reverse proxy (in this example the F5) know which website should return? The host header does the trick. We can configure a policy that contains a group of rules, which in turn based on variables like the host header performs different actions.
Creating a named based reverse proxy requires more steps that I detail below:
Step 1 – Create Virtual Server
Destination Address / Mask: When creating the virtual server, you have to assign the IP address in which the reverse proxy will listen the request to those sites you want to publish (Remember you have to create the related DNS entries for your sites to point to the reverse proxy IP).
Service Port: In this example, the proxy will listen in the 443 SSL port.
SSL Profile (Client): Logically you also have to configure a previousy uploaded SSL certificate.
Take into account that a single certificate can be configured for a single IP that is shared among all the sites. So if configuring SSL like in this example, all the sites should also share the same certificate (a wildcard certificate of the domain all the sites have in common or certificate with all the SANs – Subject Alternate Names with with all your sites domains).
SSL Profile (Server): You can configure the generic “serverssl”
Source Address Translation: Given that the virtual server must act as a proxy, it must be enabled with Automap (or SNAT with a defined SNAT IP).
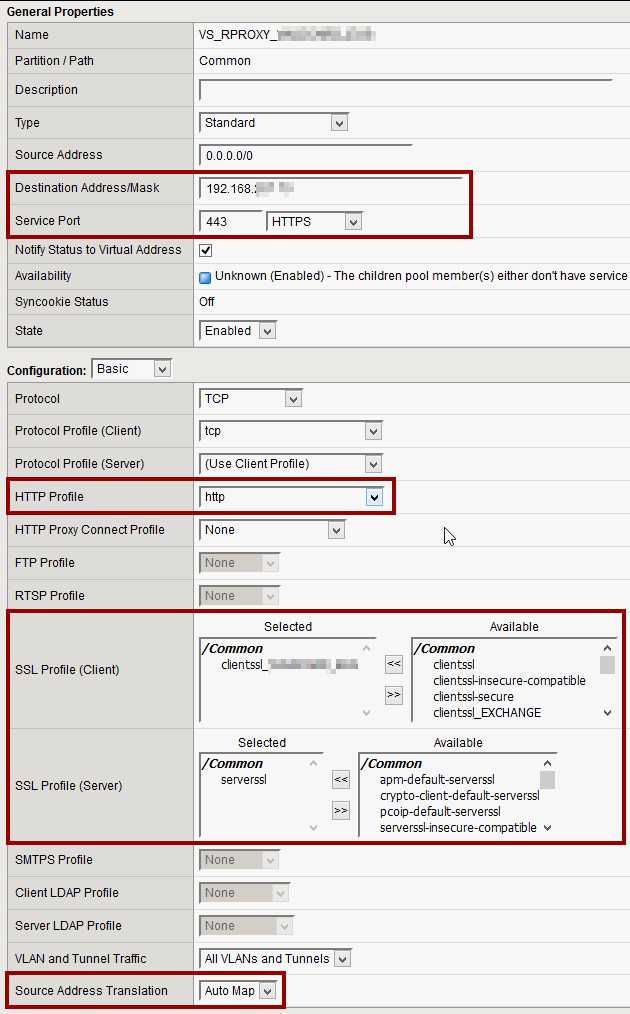
By now, leave this section empty. But later i will show how to assign the required policy
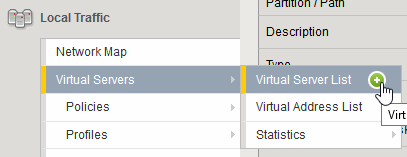
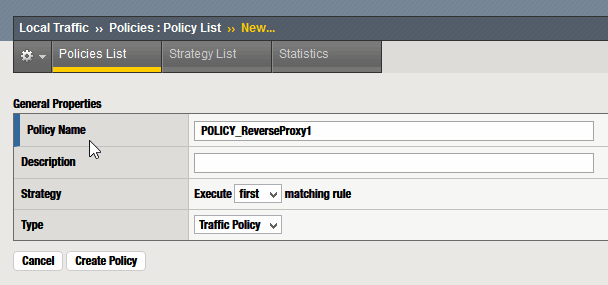
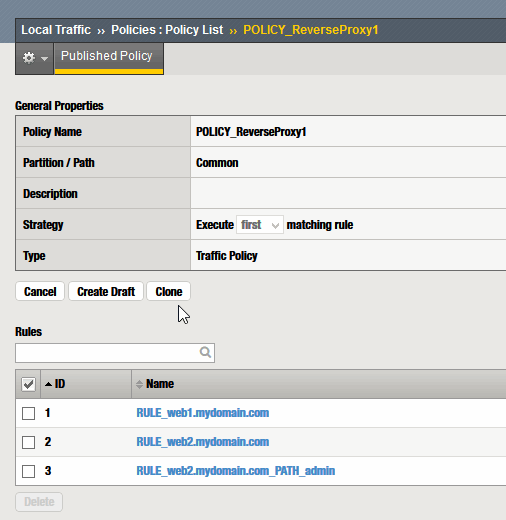
Step 2 – Create Policy
Local Traffic -> Policies -> Create (+)

Assign a name (I usually use “POLICY_<variable>”) -> “Create Policy”
Step 3 – Create Rule
A policy can contain several rules. Pulse “Create” to configure the first one
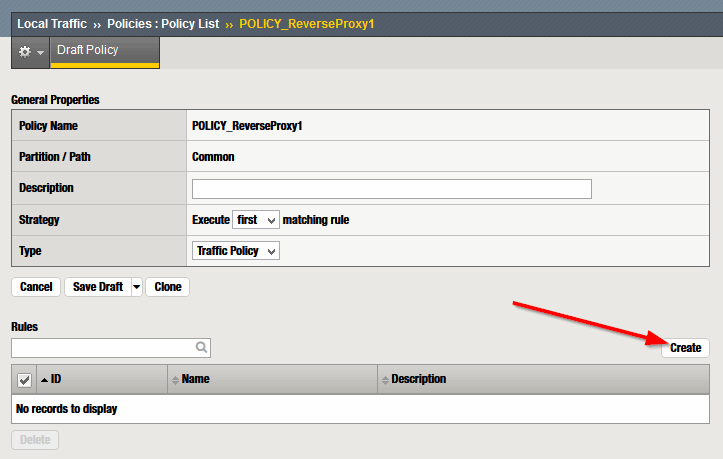
Assign a name (I usually use “RULE_<variable>”)
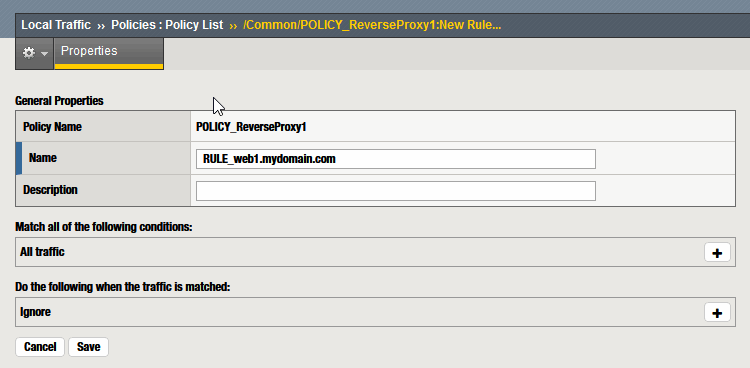
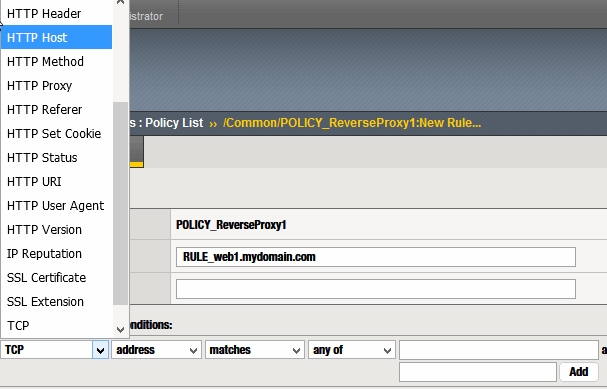
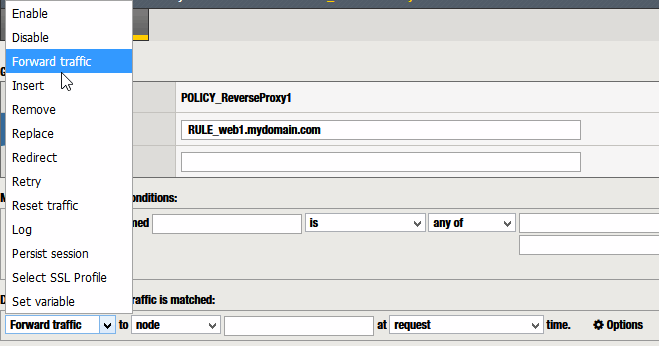
Rules consist of actions that are executed when all the conditions match.
These are some of the fields you can use as conditions (HTTP Header, HTTP URI, TCP…)
These are some of the actions you can configure (Disable – SSL, Replace – Header, Log…)
For more details and examples of rules, check the last section at the end of this post.
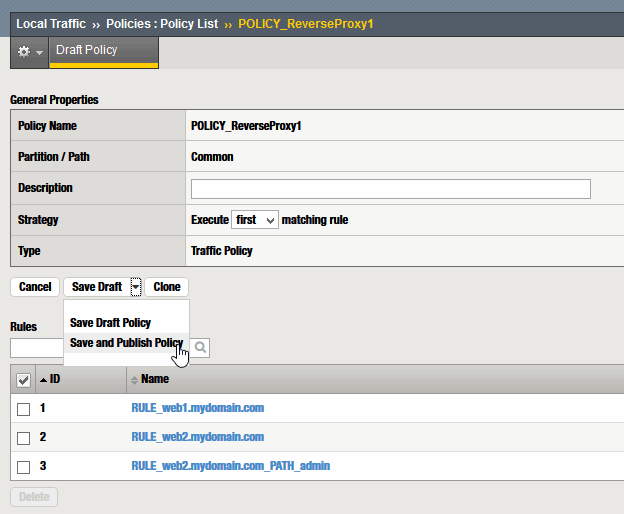
Step 4 – Publish policy
Once created the rules you need, to apply the changes “Save and Publish Policy”
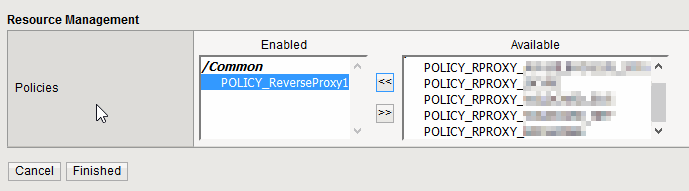
Step 5 – Assing policy to virtual server
We have create a virtual server that will listen for web requests and a policy that contains rules about those requests. But virtual server and policy still are not linked.
Virtual Server -> <VS Name> -> Resources
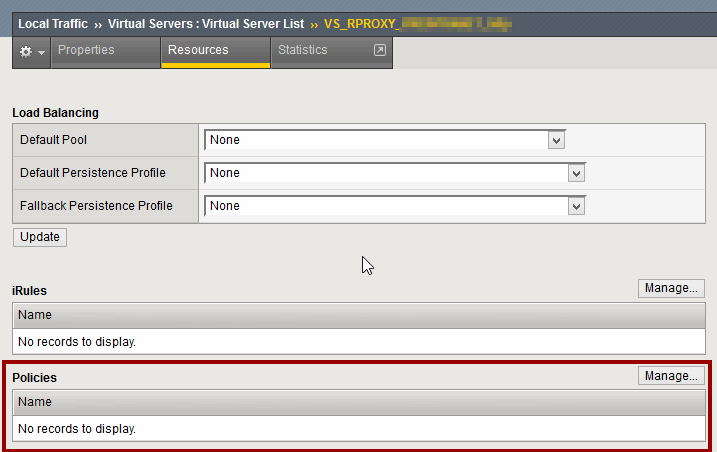
In the policies section, press “Manage” and apply the created Policy
Now you can test your newly created IP based reverse proxy.
Annex A – Modify policy
To modify an already applied policy, first you have to “Create a draft” of the policy
Once modified, created or deleted the rules… “Save and Publish Policy”
Annex B – Examples of rules (conditions and actions)
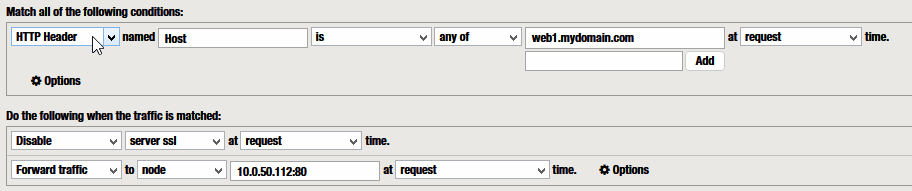
Example 1 – Host Header conditional + Forward Traffic to node
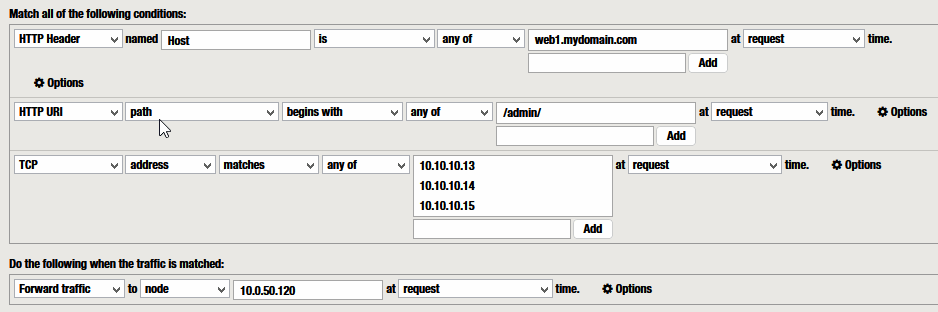
The condition I use most and the one that does the trick is…
“HTTP Header” named “Host” “is” “any of” <Host names>
combined with the action I use most
“Forward traffic” to “node” <IP>
[CLIENT] ——– https://web1.mydomain.com —> [ F5 RProxy ]
[F5 RProxy] —- https://web1.mydomain.com —-> [SRV]

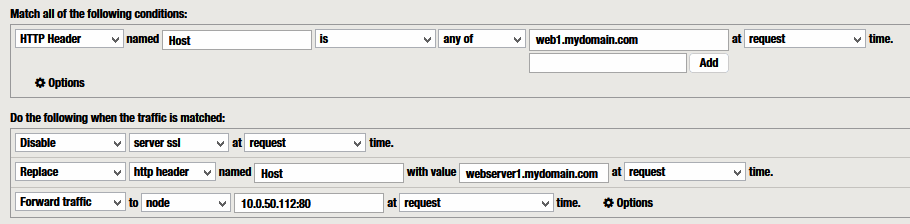
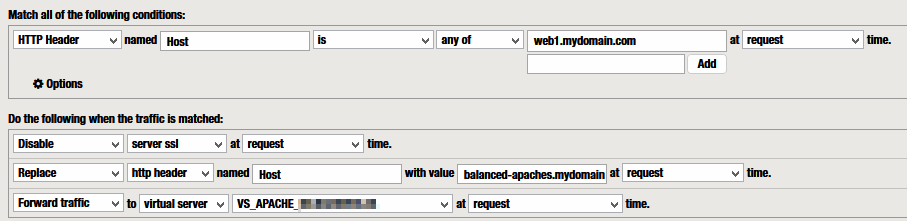
Example 2 – Disable Server SSL
This condition is interesting to disable SSL in the connection between F5 and the backend server.
“Disable” “server ssl”
[CLIENT] ——– https://web1.mydomain.com —> [ F5 RProxy ]
[F5 RProxy] —- http://web1.mydomain.com —-> [SRV]
Example 3 – Replace HTTP Header Host
To change the Host Header in the internal request:
“Replace” “http header” named “Host” with value <NEW Host>
[CLIENT] ——– https://web1.mydomain.com —> [ F5 RProxy ]
[F5 RProxy] —- http://webserver1.mydomain.com —-> [SRV]
Example 4 – Forward to virtual server
The request can also be forwarded to a POOL or Virtual Server (for example, balanced web servers) configured in the F5 itself:
“Forward traffic” to <VIRTUAL SERVER>
[CLIENT] ——– https://web1.mydomain.com —> [ F5 RProxy ]
[F5 RProxy] —- http://balanced-apaches.mydomain.com —-> [F5 VS]
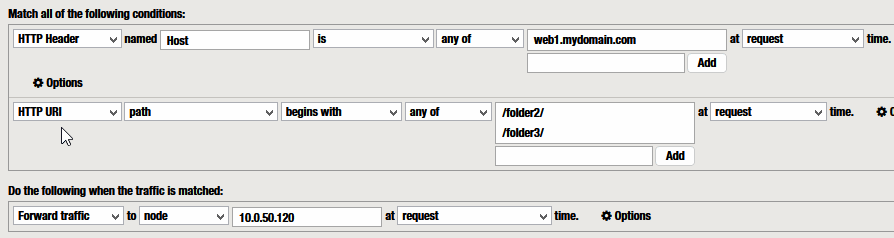
Example 5 – Condition HTTP URI path
Another interesting condition is the URI path based. :
“HTTP URI” “path” begin with any of <PATHS>
[CLIENT] ——– https://web1.mydomain.com/folder2/ —> [ F5 RProxy ]
[F5 RProxy] —- http://balanced-apaches.mydomain.com/folder2/ —-> [F5 VS]
Example 6 – Condition TCP address matches <List of IPs>
Client IP access control can also be performed using the condition:
“TCP” “address” matches any of <LIST of IPs>
[CLIENT] ——– https://web1.mydomain.com/admins/ —> [ F5 RProxy ]
… F5 checks if the client IP is one of them. if so…
[F5 RProxy] —- https://web1.mydomain.com/admins/ —-> [Web server]