NAT (Network Address Translation) can be configured in our Checkpoint FW in 2 two different ways: Manual or Automatic
Automatic NAT
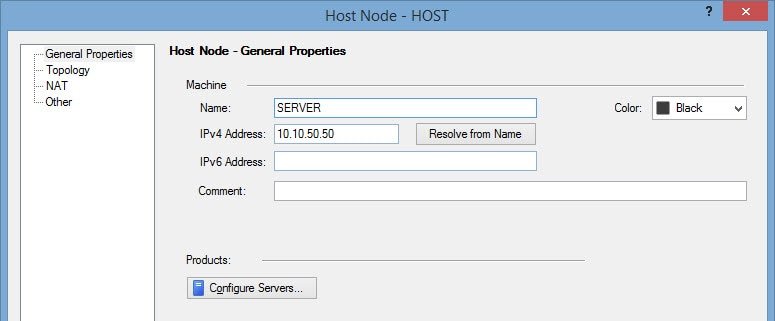
To configure the automatic NAT, the SERVER object properties has a NAT section.
So for example, if we want our host with internal private IP 10.10.50.50 to be published in Internet with public IP 80.80.100.100:
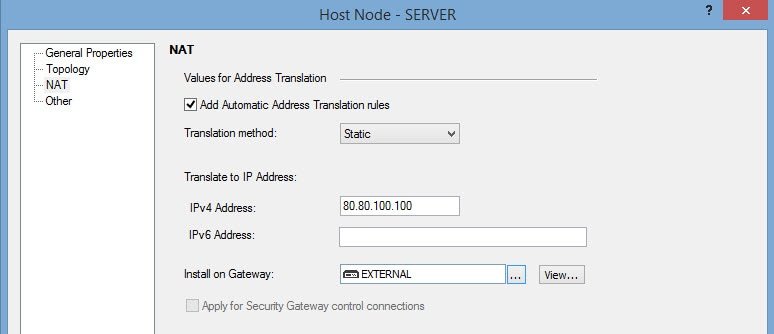
(I we only wanted to apply outbound IP masquerading, we should have applied hide NAT type.
In this example, we are also trying to publish to Internet to receive incoming connections, so static NAT type.)
For more details, visit my post Checkpoint – Hide NAT vs Static NAT
This NAT configuration automatically performs 2 actions:
1. Creation of the corresponding NAT rule
Original Packet | Translated Packet | ||||
Source | Destination | Service | Source | Destination | Service |
Any | 80.80.100.100 | Any | Original | 10.10.50.50 | Original |
2. Configuration of the corresponding Proxy ARP
After applying the automatic NAT configuration, the firewall will start reply to the ARP request asking for the 80.80.100.100 public IP. Then the firewall will 'NAT' the packet and route it to the proper gateway or to the final destination.
Its very important to apply the NAT section of the host only to the gateway we want (Instead of all, the default option)
Otherwise, in a VSX environment, all VS firewalls can start to reply those ARP request, and so, steal packets among them.
Manual NAT
To configure manual NAT, instead of using the NAT section of our HOST object we can add rules on the NAT section of our firewall policy.
To recreate the same NAT configuration as the previous example, there must also be another HOST object with the public IP configured
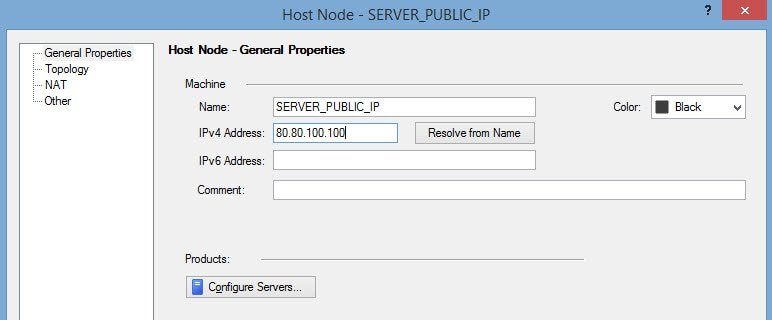
And then we can create the NAT rule:
As I said, the automatic NAT method configures the proxy ARP automatically.
When using manual NAT, the proxy ARP must be added manually. Check this post "Checkpoint – Proxy ARP for manual NAT on VSX" for more information
Manual NAT vs Automatic NAT
Then, if manual NAT requires more configurations, why should I use it?? Good question.
Sometimes we need to perform NAT based on destination port (or any combination based on the source IP, destination IP, port…)
For example:
When accesing the public IP, the destination internal IP the firewall NATs to depends on the destination port:
Or this rule allows us to access three different internal servers on the same port with a single public IP (based on the original packet destination port)
So, if the NAT rule is simple, better use Automatic NAT. Otherwise, your only option is using the Manual NAT method.
well explained
Thanks!
Great post – very well explained.
I do have a question however, can manual NAT be configured for Hide NAT and not just Static?
Thanks Mark!
Yes, its possible by doing a manual NAT rule but instead of translating the destination, translating the source.
This can have sense for example when in another network you dont manage, access control is performed and “they” await all your packets as coming from certain concrete IP (the hide IP).
Dunno if i solved your question.
I have a question. After successfully configuring a Static destination NAT rules to allow internet users (public IPs) reach the SERVER_PUBLIC_IP, do you still need to all a firewall rule to allow that traffic? If YES, what would the rule look like?
Thanks for your feedback!
Yes, you should create a rule on the policy to allow the traffic to the public IP (the POLICY is applied BEFORE the NAT).
– In case of an automatic NAT, for example, to allow HTTP port to internet users you should create a rule like:
Any -> SERVER_OBJECT (HTTP)
The SERVER_OBJECT contains both the private IP (on the global properties tab) and the public IP (on the NAT tab), so this is valid.
– In case of a manual NAT, you dont configure using the SERVER_OBJECT because it would only contain the private IP (it does not on the NAT tab when using manual NAT). So the rule would be something like:
Any -> SERVER_PUBLIC_IP_OBJECT (HTTP)
SERVER_PUBLIC_IP_OBJECT would contain the public IP on the global properties
Hope this helps you!
I have question, if I configure similar NAT rule as automatic and manually, then which which NAT rule will get triggered. I mean which NAT rule as more priority.
Hi Rajesh
The NAT policy shows manually generated NAT rules placed above the automatic ones.
So, manual NAT rules have highest priority.
In fact, for example, you also can use manual NAT rules to avoid application of automatic NAT rules for certain objects.
Hope this answer your question.
I have an internal machine which i want to translate to a particular public ip when making outbound http/web connections. I created a manual hide nat rule that translates the source address from internal ip to public ip, and also added proxy arp rule for the public ip , but it does not work. The internal machine makes no connection to the outside…
nevermind it worked. i typed in a wrong ip
Well explained! Needed that little bit of what if as I migrate rules over from ASA to Checkpoint.
Sometimes if someone else explains it with the right details, then things just click. I’m now able to talk about the existing ASA config and also talk about how, what if’s on the checkpoint as I migrate.
Thanks.
In ASA, interface is taken in account when nat rules are created. How is this happening checkpoint ? Is it possible to create source and destination IP nat in manual nat ?
– In ASA, interface is taken in account when nat rules are created. How is this happening checkpoint ?
When performing hide, interface is also taken in account.
– In ASA, interface is taken in account when nat rules are created. How is this happening checkpoint ?
Yes, my examples only showed source or destination nat one at a time, but its possible both in a single rule.
thank you
Hello Every one,
Can anyone tell me why we put the private ip in translated ip while we are create the rule with the NAT because we are doing the nat with the public ip.
Lets take example internal private IP 10.10.50.50 to be published in Internet with public IP 80.80.100.100:
So for above example public IP 80.80.100.100 should be in translated ip because we are translating the ip with the privte ip public IP 10.10.50.50.
can anyone explain me that why we put the private ip in the translated ip column instead of private IP while we are creating the manual rule because we are translating the private ip to public ip. So according to me public ip should be in translating ip and private ip in souce.
For Example:-
So for example, if we want our host with internal private IP 10.10.50.50 to be published in Internet with public IP 80.80.100.100:
Tanslated IP
Source Destination Service Source Destination Service
Any 80.80.100.100 Any Original 10.10.50.50 Original
please example why we put the private ip in destination in translated ip.
Please help me out.
Hi Nikhil
Its an example to publish (incoming connection) our web server.
So, the external clients points its web browser to our public IP address. Then, by performing NAT, the firewall points the packet to out web server private IP.
So, in the manual NAT rule the original source address is 80.80.100.100 (public), and the translated source address is 10.10.50.50 (private).
Hi,
Consider this requirement, which NAT you will propose in checkpoint ?
Only outbound traffic, unidirectional.
I believe this can only be achieved by Hide NAT
Sources = Many = 10.x.x.1, 10.x.x.2, 10.x.x.3
Destination = Two = 21.x.x.1 and 21.x.x.2
NAT IP = One = 13.x.x.2
Does this requirement can be fulfilled with Manual Static NAT ?
What small “s” mean in “Translated Column ? Is it for Static NAT ?
Thanks.
Saj
You should write book like this. I would buy it! Its simple and very understandable. 🙂
What if we want to do manual NAT on only ICMP service. How can we do it as ICMP is neither TCP nor UDP?
I know the reason why you would create a dedicated rule to NAT ICMP.
Anyway, you could try to use the object “ICMP requests” to NAT ping requests.